
Job Costing
Job costing is a form of specific order costing, which applies to a job undertaken according to customer requirements and specifications. In Tally, you can track the cost and revenue information like material, labour, and overhead for a specific job, even to the smallest detail. With a view to ascertain the actual costs incurred for each job, each job is assigned a job number or a job name.
With Job Costing, you can do the following:
- Determine the actual cost for each job, location-wise.
- Determine the revenue and expenditure, and therefore the profit associated with each job.
- Track overhead costs by allocating them for each job.
- Identify the losses on projects at an early stage.
Job Costing – An Overview
You can create multiple jobs or projects as cost centres, and track the cost and revenue associated with each project. You can also allocate costs while the job is in progress. On completion, you can compare the selling price and profit with estimates, and make informed decisions based on the profitability of each job or project.
The following capabilities make job costing in TallyPrime simple and effective:
- Track the transfer of materials from one Location to another.
- Track the consumption of materials at different locations.
- Ascertain profitability – Net Profit/loss for a particular job/project.
- View the summary of inventory movements (Opening, Inwards, Outwards, Transfer, Consumption etc.)
- Compare each element of cost, selling price and profit with other jobs on a single screen.
- Drill down to the voucher level for reference or alter transactions.
Enable Cost Centres for Job Costing
On enabling Job Costing in TallyPrime for the company, the option to use cost centres for job costing will be available in the cost centres. You can enable this option either during creation or alteration of cost centres.
To Enable Cost Centers for Job Costing > Company Button > F11 Features > Enable Cost Centers and Enable Job Costing.

Cost centres enabled for job costing will be available for selection in the Job Work Analysis report.
- Create a Cost Centre.
- In the Cost Centre Creation screen:
- Press F12 (Configure) > set the option Set Job Costing for Cost Centres to Yes, to display this option Set Job Costing for Cost Centres.
- Set the option Use for job costing to Yes.
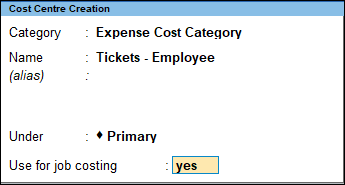
- Accept the screen. As always, you can press Ctrl+A to save.
- Press F12 (Configure) to configure your required options.
Enable Godowns for Job Costing in TallyPrime
You can create Location for job locations and allocate them to the job/project. All the materials issued or received for that particular job or project will be accounted for, and will reflect in the reports.
- Create a Godown.
- In the Godown Creation screen:
- Select a cost centre under Set job/project for job costing.
If you do not see this option, press F12 (Configure) > Set Job Costing details as Yes. - Press Enter. The Godown Creation screen appears as shown below:

Note: On specifying a project for job costing, the section Use for: section gets skipped automatically.
- Select a cost centre under Set job/project for job costing.
- Accept the screen. As always, you can press Ctrl+A to save.
Use Stock Journal Voucher Class for Job Costing in TallyPrime
Create stock journal voucher classes to account for transfer of material from one godown to another, and to account for the materials consumed for job costing.
- Alt+G (Go To) > Alter Master > Voucher Types > type or select Stock Journal and press Enter.
Alternatively, Gateway of Tally > Alter > Voucher Types > type or select Stock Journal and press Enter. - Enter the Name of Class, for example, Transfer, and press Enter to view the Voucher Type Class screen.
- Set the option Use Class for Inter-Location Transfers to Yes.

- Press Enter.
- Enter the Name of Class, for example, Consumption.
- Set the option Use Class for Job Costing Consumption to Yes.

- Press Enter. The Voucher Type Alteration screen with voucher classes appears as shown below:
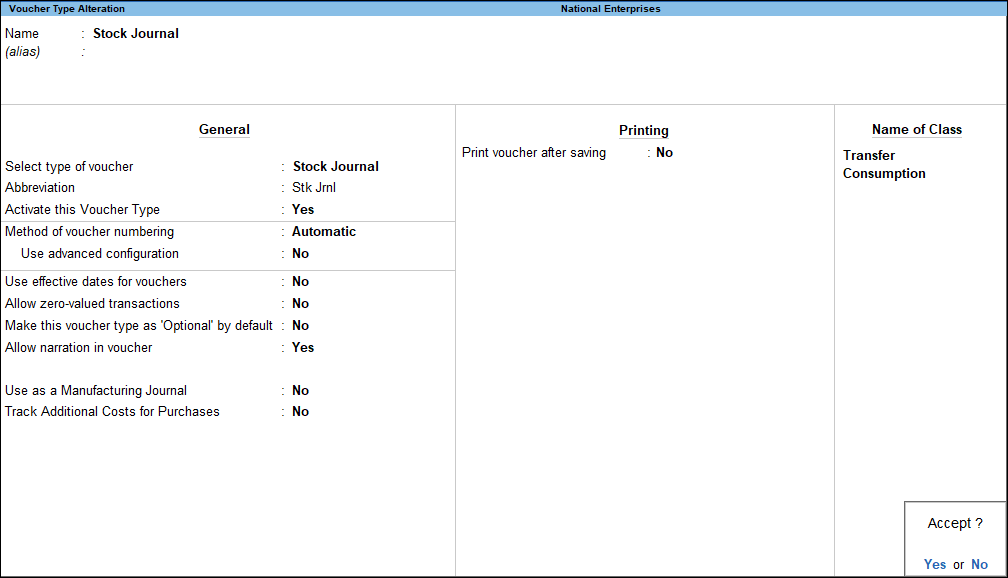
- Accept the screen. As always, you can press Ctrl+A to save the voucher type.
Allocate Costs to Projects Using Journal Vouchers
You can allocate the receipts and payments towards jobs or projects by recording journal vouchers.
- Gateway of Tally > Vouchers > Press F7 (Journal).
- Alternatively, Alt+G (Go To) > Create Voucher > press F7 (Journal).
- In the Accounting Voucher Creation screen:
- Debit the expense or income ledger.
- Credit the bank or cash ledger.
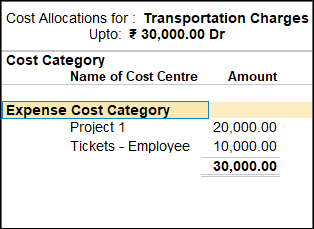
- Select the cost centres and enter the amounts.
- Accept the screen. As always, you can press Ctrl+A to save.
Allocate Costs to Projects Using Payment Vouchers
You can allocate the cost associated to an expense while recording the payment voucher.
- Gateway of Tally > Vouchers > press F5 (Payment).
Alternatively, Alt+G (Go To) > Create Voucher > press F5 (Payment). - Select the bank or cash ledger.
- Select the expense ledger.
- Enter the amount.
- Select the required cost centres and enter the respective amounts.
- Enter the transaction details in the Bank Allocations screen.

What you see on the screen can vary based on your choices. Press - Accept the screen. As always, you can press Ctrl+A to save the transaction.
Allocate Costs to Projects Using Sales Vouchers
You can allocate the costs to projects when recording a sales voucher.
- Gateway of Tally > Vouchers > press F8 (Sales).
- Alternatively, Alt+G (Go To) > Create Voucher > press F8 (Sales).
- Debit the customer ledger and enter the amount.
- Credit the sales ledger.
- Select the required cost centres and enter the respective amounts.
Refer to Sales with cost centre allocation for more information. - Accept the screen. As always, you can press Ctrl+A to save.
Note: When sales transaction is recorded in an Item Invoice, the details will be available under Cost of Sales in the Job Work Analysis - Consumption report.
Record Inter-Project Transfers
Create stock journal classes to account for transfer of material from one location to another when your company has more than one location. You can also account for the materials consumed for job costing.
- Gateway of Tally > Vouchers > press F10 (Other Vouchers) > type or select Stock Journal and press Enter.
Alternatively, Alt+G (Go To) > Create Voucher > Vouchers > press F10 (Other Vouchers) > type or select Stock Journal and press Enter. - Select the Voucher Class.
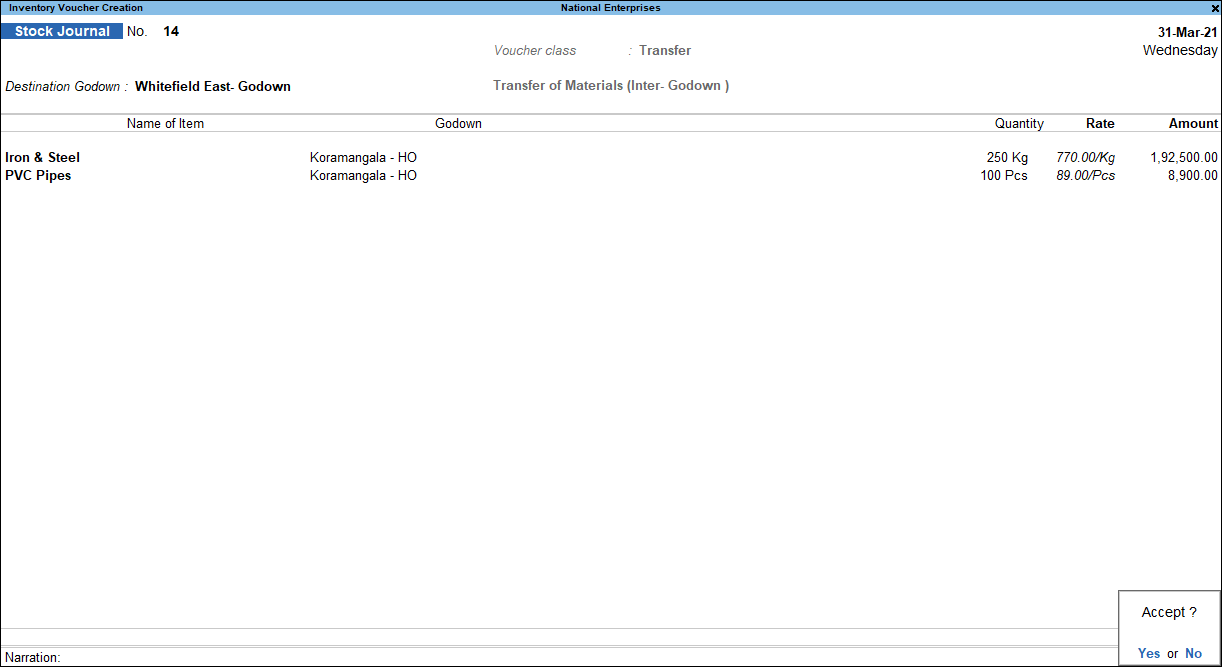
- Enter Destination Location (for which one project is assigned for job costing).
- Select the Location (for which another project is assigned for job costing).
- Enter the Quantity and Rate.
- Accept the screen. As always, you can press Ctrl+A to save.
Note: Stock Journals recorded using godowns (linked to a project), without selecting a voucher class, will be displayed under Other Transfers in the Job Work Analysis report.
0 Comments